In this article you will learn about Redux , Immutability and how to easily integrate the Redux ecosystem into an Angular2 application.
Redux
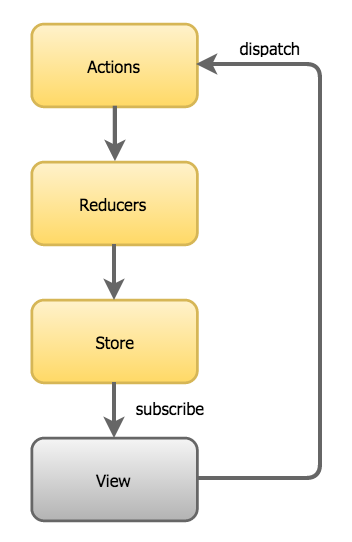
Redux is a predictable state container for JavaScript apps that evolved from Flux pattern.
Flux is a pattern for a unidirectional data flow (all data in an application follow the same lifecycle pattern) created at Facebook. With Flux the view propagates an action through a central dispatcher to various stores (holding the application’s data and business logic). As a result, the views affected by those changes are updated.

Redux reduces the “complexity” of Flux by removing the Dispatcher and by using only ONE store. Exit the Dispatcher, Redux is all about Store, Actions and Reducers.

Redux can be used by itself on any JavaScript application or using library/framework specific bindings such as react-redux for React or ng2-redux for Angular2.
Store
With Redux, your application has only one store. This store is the “single source of truth” that represents the state of your entire application.
Here is an example of a state of an app that has a counter, a current user and a side navigation menu.
{
  "isMenuOpened": false,
  "user" : {
    "firstname": "Julien",
    "sexe": "male",
    "age": 29
  },
  "counter" 0
}
Actions
To modify the store, we need to create actions. Actions are plain objects that describe the changes to apply to the state tree.
For instance, here is an action that increments the counter:
const action = {
  type: 'INCREMENT_COUNTER'
}
Now let’s learn about how to apply this action using Reducers.
Reducers
Reducers are pure functions that take the previous state and an action, and return the next state.
Pure functions can be described as the following:
- Predictable
- Testable
- Declarative
- Return a new reference
- Do not mutate arguments
Here is an example of our counter reducer:
const INITIAL_STATE = 0;
export default function counter(state = INITIAL_STATE, action) {
  switch (action.type) {
    case INCREMENT_COUNTER:
      return state + 1;
    case DECREMENT_COUNTER:
      return state - 1;
    default:
      return state;
  }
}
Several things to notice here:
- We need an initial state (INITIAL_STATE). It will be the value of your state when the app starts.
- We always return the previous state as
default. This is when no actions match, we do not want anything to change so we return the old state. - In a case where an action matches, we return a new reference. That is what pure functions do (no mutation).
Creating a store
To create a store you need to register all the reducers of your app using combineReducers method:
import { createStore, combineReducers } from 'redux'
import reducerIsMenuOpened from './reducers/isMenuOpened'
import reducerCounter from './reducers/counter'

// Create a store with several reducers
let store = createStore(combineReducers({
  isMenuOpened: reducerIsMenuOpened,
  counter: reducerCounter
})
Now we can use the store reference to subscribe, dispatch, or getState. These are the only methods you will ever need.
getState method returns the state tree at the moment you ask:
store.getState()subscribe is called whenever the state tree changes:
store.subscribe(() => console.log(store.getState())The only way to change the state tree is to emit an action through a dispatch method:
store.dispatch(action)This was a quick introduction because I assumed that you were a little bit familiar with Redux (not really new). If you need more information about it I suggest you go to the Redux docs or read another post of mine: Introduction to Redux and React-Redux
Immutability
An immutable object is an object whose state cannot be modified after it is created. To create an immutable object you can use Object.freeze(obj) .
Whenever a change is required, a deep copy is made and a new reference is returned. That way comparing two states of any data is easy, a simple reference check is needed (state1 == state2).
On the other hand for mutable objects a deep check is necessary (checks every node of your tree) which can be really expensive (depending on the size of your data).
There are libraries helping you to create immutable objects such as immutable-js . But I will show you with those examples that it is not necessary at all.
String, number and boolean
Primitives such as string, number and boolean always return a new reference. There is no way you could mutate them, so you do not have to worry about them. For instance adding 1 to our counter is as easy as this:
switch (action.type) {
  case INCREMENT_COUNTER:
    return state + 1;
}
Arrays
In general, I avoid using arrays to store data. Arrays can easily be mutated when using splice, shift, pop or push methods. Also finding elements on a large dataset can be expensive.
If you do want to use arrays you can use concat or slice to avoid mutations:
switch (action.type) {
  case ADD_ITEM:
    return state.concat(["newValue"]);
  case REMOVE_ITEM:
    return state.slice(0, index)
        .concat(state.slice(index, index + 1));
}
Rewritten the ES6 way with the spread operator:
switch (action.type) {
  case ADD_ITEM:
    return [...state, "newValue"];
  case REMOVE_ITEM:
    return [
       ...state.slice(0, index),
       ...state.slice(index, index + 1)
       ]
}
Object literal
Dictionaries are my favorite way to store data. It is easier to add, remove or retrieve an item from it:
switch (action.type) {
  case ADD_ITEM:
    return Object.assign({}, state, {newKey: "newValue"});
  case REMOVE_ITEM:
    const copiedState = Object.assign({}, state)
    delete copiedState.newKey;
    return copiedState;
}
Rewritten the ES7 way with the object spread operator:
switch (action.type) {
  case ADD_ITEM:
    return {...state, newKey: "newValue"};
  case REMOVE_ITEM:
    const copiedState = {...state}
    delete copiedState.newKey;
    return copiedState;
}
Angular2
Immutability is also a great benefit to add to Angular2. Indeed, if you use immutables with the right change detection strategy , your app can save a lot of unnecessary checks.
For instance using changeDetection: ChangeDetectionStrategy.OnPush tells your component to update only if the input reference has changed:
@Component({
  changeDetection: ChangeDetectionStrategy.OnPush
})
class VCardCmp {
  @Input() myInput;
}
If you are interested to learn more about that I recommend a great article by Pascal Precht: ANGULAR 2 CHANGE DETECTION EXPLAINED
Redux and Angular2
Using Angular you are probably used to create services to handle the data logic of your app. Retrieving data from a server, storing it in memory, localstorage or indexedDB on a specific service is a really common pattern.
The problem is that it does not scale very well. On large scale applications you could end up with dozens of services sharing most of the same code. The more your app grows, the more services you have, the more the dependency injection becomes a pain.
A good solution to these problems is using Redux:
- Single source of truth (not dozens of services)
- Single Injection (Redux service is enough)
- Unified API (getState, dispatch and subscribe)
- Possibility to synchronize with localstorage/indexedDB in single place
Angular2 being relatively new, several Redux libraries are competing at the moment. If we put ngrx/store aside the most popular library is ng2-redux .
Why putting ngrx/store aside? Well, because it is not Redux! It is inspired by Redux but does not have the same API and cannot rely on Redux ecosystem (Thunks, Dev tools etc.).
It is worth noting that you can use Redux by itself with Angular2, I recommend a great article by Houssein Djirdeh: building angular 2 applications with immutable.js and redux
ng2-redux
ng2-redux (Angular 2 bindings for Redux) kept what made Redux popular: a simple API (getState, dispatch and subscribe) and a great ecosystem.
If like me you experienced using Redux with React and react-redux first, you will find ng2-redux to be very familiar.
combineReducers
To combine reducers you can directly use Redux’s combineReducers method. If we keep the same store as in the beginning of the article:
{
  "isMenuOpened": false,
  "user" : {
    "firstname": "Julien",
    "sexe": "male",
    "age": 29
  },
  "counter" 0
}
Here is how the rootReducer should look like.
import {
  combineReducers
} from 'redux';

import { CounterReducer } from './counter';
import { UserReducer, IUser } from './user';
import { isMenuOpenedReducer } from './isMenuOpened';

export interface IAppState {
  isMenuOpened: boolean;
  user: IUser;
  counter: number;
}

export const rootReducer = combineReducers({
  isMenuOpened: isMenuOpenedReducer,
  user: UserReducer,
  counter: CounterReducer
});
createStore
Once you have the rootReducer you can create your store. Once again, this is still Redux and not ng2-redux.
import {
  Store,
  createStore
} from 'redux';
import { rootReducer, IAppState } from './reducers';

export const store = createStore(
  rootReducer
) as Store<IAppState>;
configureStore
Now that we have our store, we need to inject it to our app using ng2-redux this time.
import { NgRedux } from 'ng2-redux';

@Component({ /* ... */ })
class App {
  constructor(private ngRedux: NgRedux<IAppState>) {
    this.ngRedux.provideStore(store);
  }
}
We now have access to Redux’s methods (i.e. dispatch, subscribe and getState) directly through ngRedux service:
class MyComponent {
  getUserFirstName() {
    const { user } = this.ngRedux.getState();
    return user.firstname;
  }
}
connect
Connect allows you to connect a Component to the store. It is recommended as a best practice to create two kinds of components.
- Presentational components (How things look: markup, style).
- Containers (How things work: manipulate the store).
Containers give life to Presentational components by giving them inputs.
It is easier to understand with a React example. Here we create Presentational component (Menu) that has one purpose: displaying the menu.
export const Menu = ({ isMenuOpened, toggleMenu }) => (
  <div>
    <button onClick={toggleMenu}>Toggle menu</button>
    <ul className={isMenuOpened ? 'menu-opened' : 'menu-closed'}>...</ul>
  </div>
);
As you can see, it expects two props (input): isMenuOpened and toggleMenu. As it does not have a state, it is called a stateless component.
Now in order for our Menu component to have a purpose, we need to feed it with isMenuOpened and toggleMenu props.
import { connect } from 'react-redux'
import Menu from './Menu'
import { toggleMenu } from '../actions/menu'

const mapStateToProps = (state) => ({
  isMenuOpened: state.isMenuOpened
})

const mapDispatchToProps = (dispatch) => ({
  toggleMenu: () => dispatch(toggleMenu())
})

export default connect(
  mapStateToProps,
  mapDispatchToProps
)(Menu)
connect returns a new Container component.
It is important to notice that:
- Presentational components are not aware or Redux, Containers are.
- Presentational components read data from props while Containers
subscribeto the store. - Presentational components write data by invoking callback while Containers
dispatchactions. - Presentational components should be stateless if possible (best practice).
Now if we transpose to Angular2 and ng2-redux, here is how it looks like:
import { Component } from '@angular/core';
import { Menu } from '../components/Menu';
import { NgRedux } from 'ng2-redux';
import { bindActionCreators } from 'redux';

// NB: 'import * as MenuActions' won't provide the right type
// for bindActionCreators.
const MenuActions = require('../actions/MenuActions');

@Component({
    directives: [Menu],
    template: `
      <Menu
        [isMenuOpened]="isMenuOpened"
        [toggleMenu]="actions.toggleMenu">
      </Menu>
    `
})
export class Counter {
  private isMenuOpened: boolean;

  constructor(private ngRedux: NgRedux<IAppState>) {
    ngRedux.connect(this.mapStateToTarget, this.mapDispatchToThis)(this);
  }

  ngOnDestroy() {
    this.disconnect();
  }

  mapStateToTarget(state) {
    return { isMenuOpened: state.isMenuOpened };
  }

  // Will result in a method being created on the component for each action creator
  mapDispatchToThis(dispatch) {
    return { actions: bindActionCreators(MenuActions, dispatch) };
  }
}
It is worth noting that Angular 2’s view layer is more optimized for Observables and the @select decorator.
@select decorator
This is a better way to use the connect pattern with Angular2. I prefer this syntax as it is more declarative, concise and has better performance (trusting the lib author here):
import { Component } from '@angular/core';
import { Menu } from '../components/Menu';
import { NgRedux, select } from 'ng2-redux';
import { toggleMenu } = require('../actions/MenuActions');

@Component({
    directives: [Menu],
    template: `
      <Menu
        [isMenuOpened]="isMenuOpened"
        [toggleMenu]="toggleMenu">
      </Menu>
    `
})
export class Counter {
  @select() isMenuOpened;

  constructor(private ngRedux: NgRedux<IAppState>) {}

  toggleMenu = () => this.ngRedux.dispatch(toggleMenu())
}
Dev tools
Redux comes with great dev tools that you can use in your Angular2 app if of course you use either Redux itself, ng2-redux or any other libraries based on Redux (will not work with ngrx/store).
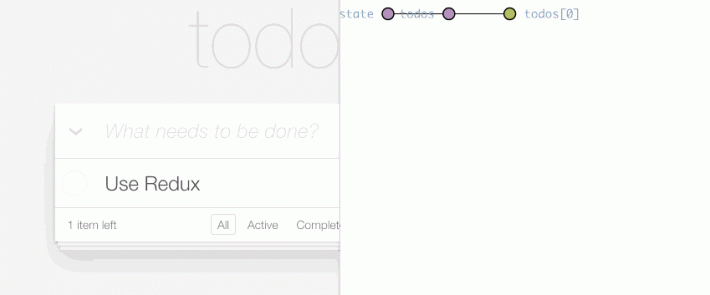
Chart monitor allows you to vizualize the state tree. It can help you understand the complexity of your state.

State inspector gives you a way to inspect every action that happened in your app. For every action you have access to the state and what changed (diff). You can also remove an action right in the middle of the action stack to test the state as if an action (or several) never happened.

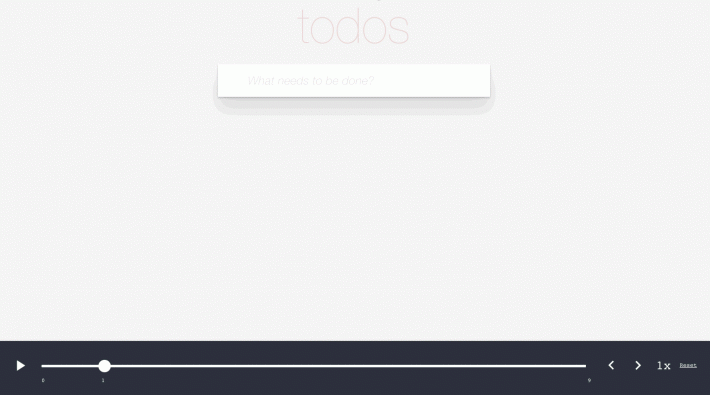
Time machine allows you to replay a stack of actions.

These dev tools can either be installed in your project (adding dependencies) or as a chrome extension . I recommend using the chrome extension; it does not add dependencies to your project and can be shared with all your applications that use Redux.
Here is how to install it:
import {
  Store,
  createStore
} from 'redux';
import { rootReducer, IAppState } from './reducers';

export const store = createStore(
  rootReducer,
  window.devToolsExtension && window.devToolsExtension()
) as Store<IAppState>;
Conclusion
With this presentation of Redux and ng2-redux I hope you are now interested in using them in your Angular2 apps. Redux is really addictive, once you start with it, there is no coming back!