Flux
Flux is the application architecture that Facebook uses for building client-side web applications
Flux is a pattern for a unidirectional data flow that inspired Redux so it is interesting to learn about it as well. With Flux the view propagates an action through a central dispatcher to the various stores (holding the application’s data and business logic). As a result the views affected by those changes are updated.

Flux was introduced two years ago and was a big success. Tones of librairies based on the Flux pattern emerged (Flummox , Alt , Fluxxor , etc..), selecting one or the other was a real dilemma at the time (famous JS fatigue). Out of this chaos arose the Redux revolution.
Redux
Redux is a predictable state container for JavaScript apps.
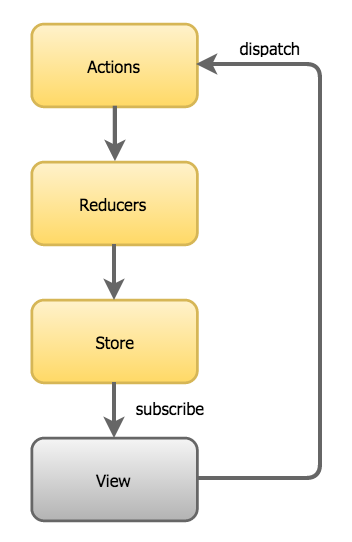
Redux evolves from the Flux pattern, but reduces its complexity by removing the Dispatcher and by using only one Store. Exit the Dispatcher, Redux is all about Store, Actions and Reducers.

As your app grows, instead of adding stores, you split the root reducer into smaller reducers independently operating on the different parts of the state tree.
You can use Redux together with React, or with any other view library.
Installation
npm install --save reduxStore
With Redux your application has only one store. This store is the “single source of truth” that represents the state of your entire application.
Here is an example of a state of an app that has a user and an expandable menu.
{
  "isMenuOpened": false,
  "user" : {
    "firstname": "Julien",
    "sexe": "male",
    "age": 29
  }
}
Actions
Now that we have our initial state tree, how to modify it? To modify it we need to create actions. An action is an object describing the changes we want to make to our state tree.
Here is an action that will open our menu:
const action = {
  type: 'MENU_OPEN'
}
Here is another on that will change the firstname of our user:
const action = {
  type: 'USER_UPDATE_FIRSTNAME',
  newFirstName: 'Marie'
}
We are now ready to make changes to our state tree! To do so we will use Reducers.
Reducers
Reducers are pure functions that take the previous state and an action, and return the next state.
Pure functions can be described as the following:
- Predictable
- Testable
- Declarative
- Return a new reference
- Do not mutate arguments
Here is our reducer that handle the menu state:
// Initial state to false meaning the menu is closed by default
function menuReducer(state = false, action) {
  switch (action.type) {
  case 'MENU_OPEN':
    return true
  case 'MENU_CLOSE':
    return false
  case 'MENU_TOGGLE':
    return !state
  default:
    return state
  }
}
Here is an example of our user reducer:
// Initial state is a user (just for the demo)
// In a real app you will want to set the logged in user asynchronously
// for instance
const initialState = {"firstname": "Julien", "sexe": "male", "age": 29};
function userReducer(state = initialState, action) {
  switch (action.type) {
  case 'USER_UPDATE_FIRSTNAME':
    // ES7 Object spread or ...
    return {...state, firstname: action.newFirstName }
    // ... ES6 Object assign
    return Object.assign({}, state, {firstname: action.newFirstName} })
  default:
    return state
  }
}
Several things to notice here:
- We always return the previous state as default. This is in case no actions match, we do not want anything to change so we return the old state.
- We always return a new reference. That’s what pure functions do. Immutability has also a performance benefit as your app can know if your state changed or not simply by
===it. - We always have an initial state. That will be the value of your state when the app starts.
Now that we know our primitive concepts: Store, Actions and Reducers we need to learn how everything work together.
Creating a store
To create a store you need to register all the reducers of your app using combineReducers method:
import { createStore, combineReducers } from 'redux'
import reducerIsMenuOpened from './reducers/isMenuOpened'
import reducerUser from './reducers/user'

// Create a store with several reducers
let store = createStore(combineReducers({
  isMenuOpened: reducerIsMenuOpened,
  user: reducerUser
})
Now we can use the store reference to subscribe, dispatch, or getState. These are the only methods you will need.
getState method returns the state tree at the moment you ask:
store.getState()subscribe is called whenever the state tree changes:
store.subscribe(() => console.log(store.getState())The only way to change the state tree is to emit an action through a dispatch method:
store.dispatch(action)Let’s try it out!
// Subscribe to any change and dump in the console
store.subscribe(() => console.log(store.getState())

// Dump the initial state:
console.log(store.getState())
/*
{
  "isMenuOpened": false,
  "user" : {
    "firstname": "Julien"
  }
}
*/
const actionMenuOpen = {
  type: 'MENU_OPEN'
}
store.dispatch(actionMenuOpen)
// Dumps
/*
{
  "isMenuOpened": true,
  "user" : {
    "firstname": "Julien"
  }
}
*/
const actionChangeFirstName = {
  type: 'USER_UPDATE_FIRSTNAME',
  newFirstName: 'Marie'
}
store.dispatch(actionChangeFirstName)
// Dumps
/*
{
  "isMenuOpened": true,
  "user" : {
    "firstname": "Marie"
  }
}
*/
Now that we learnt Redux basics (Store, Actions and Reducers), let see how to use it with React.
React-redux
React-redux is the official library that supports React bindings for Redux.
Installation
npm install --save redux react-reduxCreating a store
With React-redux you do not need to subscribe to store changes in your components.
To create the store we only need redux and it is exactly the same as if you were using vanilla ES6 JavaScript.
import { combineReducers } from 'redux'
import reducerIsMenuOpened from './reducers/isMenuOpened'
import reducerUser from './reducers/user'

export default createStore(combineReducers({
  isMenuOpened: reducerIsMenuOpened,
  user: reducerUser
})
Our store is now created, all we need to do is to make it available to every component of our application. To do so we need to wrap our RootComponent (it could be anything) with React-redux’s Provider component.
import React from 'react'
import ReactDOM from 'react-dom'
import { Provider } from 'react-redux'
import store from './pathToPreviousFile'

ReactDOM.render(
  <Provider store={store}>
    <RootComponent />
  </Provider>,
  document.getElementById('root')
)
The store is now available to any component of your application through context but you will not use it yourself. Interacting with the store is the role of Containers.
Containers
Containers are high order components that aim to communicate with the store for you. The container gives you access to your state tree and to the dispatch method.
Let’s create a simple menu component to explain how containers work.
const Menu = ({
  isMenuOpened,
  toggleMenu
}) => (
  <div>
    <button onClick={toggleMenu}>Toggle menu</button>
    <ul className={isMenuOpened ? 'menu-opened' : 'menu-closed'}>
      <li>Menu 1</li>
      <li>Menu 2</li>
    </ul>
  </div>
)
export default Menu
As you can see our component is stateless and only has two props:
isMenuOpened: set a specific CSS class to display or hide the menutoggleMenu: Dispatch an action to toggle the menuisMenuOpenedflag
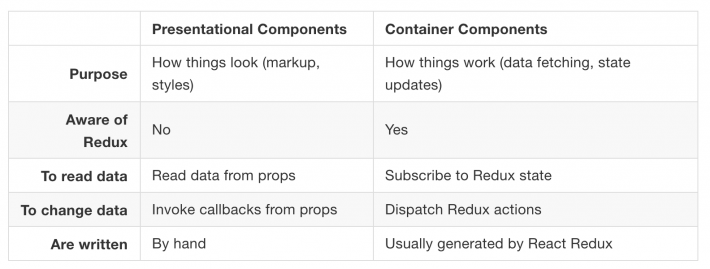
The Menu component does not have any clue if your app uses Redux or not. It is what we call a presentational component, it only communicate through props.
Now let’s create a container to wrap our Menu presentational component:
import { connect } from 'react-redux'
import Menu from './Menu'
import {toggleMenu} from '../actions/menu'

const mapStateToProps = (state) => {
  return {
    isMenuOpened: state.isMenuOpened
  }
}

const mapDispatchToProps = (dispatch) => {
  return {
    toggleMenu: () => dispatch(toggleMenu())
  }
}

export default connect(
  mapStateToProps,
  mapDispatchToProps
)(Menu)
The connect method creates a new component from mapStateToProps (allow you to select the data necessary to your component and insert them as props), mapDispatchToProps (allow you to dispatch actions to modify the state tree) and the Menu component.
Instead of using the Menu component now you can use the MenuContainer that is aware of Redux and is meant to interact with the app store.
Here is a little recap of the differences between a presentational component and a container the taken from Redux documentation.

Now you have all the knowledge necessary to create your own app using React and Redux. If you want to know more details especially about async operations (through thunks) I highly recommend this series of videos by the creator of Redux himself Dan Abramov .
Also if you want to know more about Flux, here is a video of its creator: Jing Chen