Facebook surprised hundred thousands of developers on January 28th by shutting down Parse services.
We have a difficult announcement to make. Beginning today we’re winding down the Parse service, and Parse will be fully retired after a year-long period ending on January 28, 2017
This announcement created a cataclysm amongst the community and the #parse became trending on Twitter.
If you are like me, struggling about what to do with your current applications running on Parse, you can stop worrying right now. With 20 minutes of your time and only $5/month you can have your Parse server running with your current data.
First you will need to create a droplet at DigitalOcean (Using this referral link you will get $10 credit).
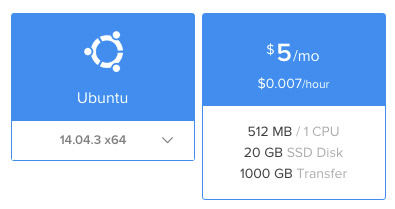
Select whatever Linux distribution you want but for this tutorial we will use Ubuntu 14.04 (64-bit):
Add your machine SSH key then click “Create”. In less than a minute you will get your droplet ready.
To log in your new machine get your IP address and type this command on your terminal:
$ ssh root@<yourIpAddress>Now that we are logged in as Root, it is time to setup your machine!
Prerequisites
- Node 4.1
- MongoDB version 2.6.X or 3.0.X
- Python 2.x
Installation
Start by updating the package list and install basic packages.
sudo apt-get update
sudo apt-get install build-essential
Node 4.1
We will install Node 4.1 via NVM (Node Version Manager)
# get the latest nvm release https://github.com/creationix/nvm/releases
curl -o- https://raw.githubusercontent.com/creationix/nvm/v0.30.2/install.sh | bash

# Restart your terminal or run
source ~/.profile

# Install the NodeJS version needed
nvm install 4.1

# Select the right version
nvm use 4.1

# update npm
npm install npm -g
Now to test that node is installed type node:
$ node
> console.log('foobar')
foobarMongoDB
Ubuntu ensures the authenticity of software packages by verifying that they are signed with GPG keys, so we first have to import their key from the official MongoDB repository:
sudo apt-key adv --keyserver hkp://keyserver.ubuntu.com:80 --recv 7F0CEB10After successfully importing the key you will see:
Output
gpg: Total number processed: 1
gpg:               imported: 1  (RSA: 1)
Next, we have to add the MongoDB repository details so APT will know where to download the packages from:
echo "deb http://repo.mongodb.org/apt/ubuntu "$(lsb_release -sc)"/mongodb-org/3.0 multiverse" | sudo tee /etc/apt/sources.list.d/mongodb-org-3.0.listNow we can update packages and install MongoDB:
sudo apt-get update
sudo apt-get install -y mongodb-org
Make sure MongoDB is running:
$ service mongod status
mongod start/running, process 2008
You can also stop, start, and restart MongoDB using the service command (e.g. service mongod stop, server mongod start).
To avoid the following error Failed global initialization: BadValue Invalid or no user locale set when trying to log in to your database, we need to set the locale:
$ nano /etc/environmentAdd those two lines at the end of the file:
LC_ALL=en_US.UTF-8
LANG=en_US.UTF-8
Then save, exit (CTRL+O CTRL+X), logout and re log in:
$ exit
# Re log in
$ ssh root@<yourIpAddress>
We can now log in your MongoDB instance:
$ mongo
MongoDB shell version: 3.0.9Python
Python is already installed on DigitalOcean’s droplets:
$ python
Python 2.7.6 (default, Jun 22 2015, 17:58:13)
Migrate Parse DB
Prepare external connections
To migrate your data we need to create an admin user first:
$ mongo
> use admin
switched to db admin
Add a user to the admin DB (change <username> and <password> with your own):
> db.createUser(
  {
    user: 'username',
    pwd: 'password',
    roles: [ { role: 'userAdminAnyDatabase', db: 'admin' } ]
  }
)
Once Successfully added user message is display we can turn the localhost exception off:
> auth = true
> setParameter = enableLocalhostAuthBypass=0
To allow external connection to your database we need to temporarily disable the remote restriction (until you completely stop using parse.com services).
$ nano /etc/mongod.confComment this line (adding # at the beginning of the line):
bind_ip = 127.0.0.1Then restart the MongoDB instance:
$ service mongod restartTransfer data
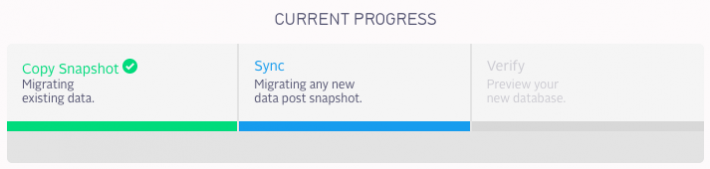
Use the Parse database migration tool to transfer your data (found in the new dashboard under App Settings > General > Migrate to external database).

Click “migrate”:
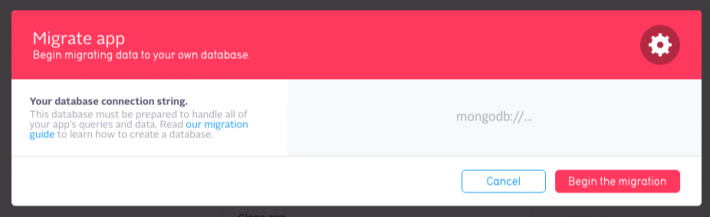
Then it will ask for the MongoDB URI connection scheme which looks like this:
mongodb://[username:password@]host1[:port1][,host2[:port2],...[,hostN[:portN]]][/[database][?options]]
In the input type mongodb://<username>:<password>@<yourIpAddress> and click “Begin the migration”.
As we made sure that the user in the connection string had admin privileges so the next screen you see would be an prompt about SSL connection:
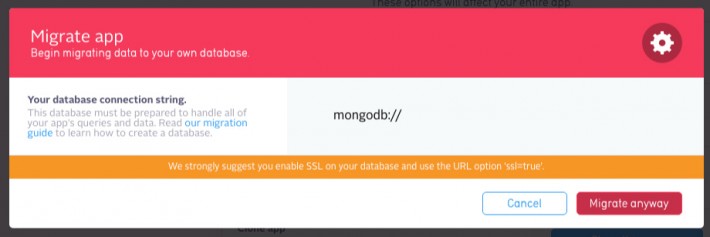
Depending on the privacy of the data you want to transfer use the SSL option or not ?ssl=true.
Next screen will be this one:
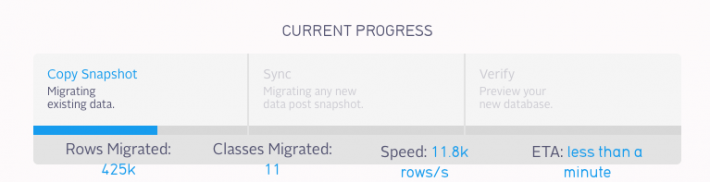
When the transfer is finished you will see the following:
We have now access to our data!
$ mongo
MongoDB shell version: 3.0.9
connecting to: test
> show dbs
admin  0.078GB
local  0.078GB
test   0.953GB
> use test
switched to db test
> show collections
_Cardinality
_GlobalConfig
_Index
_JobSchedule
_SCHEMA
etc..
Configure Parse server
Install
Parse Server is meant to be mounted on an Express app. Express is a web framework for Node.js. The fastest way to get started is to clone the Parse Server repo, which at its root contains a sample Express app with the Parse API mounted.
First install Git:
$ sudo apt-get install gitThen find a place to clone the parse-server-example repository. Recommended /var/www/:
$ cd /var/
$ mkdir www
$ cd www/
$ git clone https://github.com/ParsePlatform/parse-server-example.git parse
$ cd parse/
Now we can instal the dependencies express, parse and parse-server:
$ npm installTo make sure the Parse server is running you can run this npm script:
$ npm run start

> parse-server-example@1.0.0 start /var/www/parse
> node index.js
DATABASE_URI not specified, falling back to localhost.
parse-server-example running on port 1337.
Now open your browser at http://<yourIpAddress>:1337/parse.
You should see this JSON response:
{"error":"unauthorized"}Use your database
There are four environment variables that you can use:
- DATABASE_URI (default ‘mongodb://localhost:27017/dev’)
- CLOUD_CODE_MAIN (default ‘/cloud/main.js’)
- PARSE_MOUNT (default ‘/parse’)
- PORT (default 1337)
We can keep the default for now but if you want to modify one of them:
export PARSE_MOUNT=<yourEndpoint>Open index.js and add your <appID> and <masterKey>:
$ nano index.jsvar api = new ParseServer({
databaseURI: process.env.DATABASE_URI || 'mongodb://localhost:27017/dev',
cloud: process.env.CLOUD_CODE_MAIN || __dirname + '/cloud/main.js',
appId: '<appID>',
masterKey: '<masterKey>'
});Restart your server:
$ npm run startThen to test if you can query your own Parse server run the following CURL command on your machine:
curl -X GET \
  -H "X-Parse-Application-Id: <appID>" \
  -H "X-Parse-Master-Key: <masterKey>" \
  -G \
  http://<yourIpAddress>:1337/parse/classes/<yourClass>/<yourClassItemId>
The result should be a JSON response containing the item you queried:
{"objectId":"CbsgKCNZxM","createdAt":"2015-12-14T05:26:03.609Z","updatedAt":"2015-12-21T00:23:44.561Z","title":"What's new this week?","type":"info","active":false}That’s it you are now running your own Parse server on your own architecture.
If you want your app to point to your own Parse server do not forget to configure your Parse SDK:
// JavaScript
Parse.initialize("YOUR_APP_ID");
Parse.serverURL = 'http://localhost:1337/parse'
Using Parse SDKs with Parse Server
Now it is time to secure your server and move on!
Secure your server
Now that you have your Parse server running is it time to secure you server starting with removing Root access and creating your own user.
First log in as root
$ ssh root@<yourIpAddress>Create a New User
We will create a new user named newUser for demonstration purpose. You can call it whatever you want.
$ adduser newUser
Adding new group `newUser' (1000) ...
Adding new user `newUser' (1000) with group `newUser' ...
Creating home directory `/home/newUser' ...
Copying files from `/etc/skel' ...
Enter new UNIX password:
Retype new UNIX password:
Give Root Privileges to your new user
$ gpasswd -a newUser sudo
Adding user newUser to group sudo
Copy your ssh key to the server
In your local machine run the following:
$ ssh-copy-id root@<yourIpAddress>After providing your password at the prompt, your public key will be added to the remote user’s .ssh/authorized_keys file. The corresponding private key can now be used to log into the server.
Add Public Key to New Remote User
Enter the following command to switch to the new user
root@XXXX:~# su - newUser
newUser@XXXX:~$
Create a new directory called .ssh and restrict its permissions with the following commands:
$ mkdir .ssh
$ chmod 700 .ssh
Copy the SSH key (local machine) to your clipboard:
# OSX
$ pbcopy < ~/.ssh/id_rsa.pub

# Unix
$ sudo apt-get install xclip
$ xclip -sel clip < ~/.ssh/id_rsa.pub

# Windows
$ clip < ~/.ssh/id_rsa.pub
Now insert it into .ssh/authorized_keys and save using nano nano .ssh/authorized_keys.
# set permission
$ chmod 600 .ssh/authorized_keys
Then got back to the root user so we can modify ssh access.
newUser@XXXX:~$ exitConfigure SSH Daemon
Open ssh config file:
$ nano /etc/ssh/sshd_configSearch for PermitRootLogin using CTRL+W command.
Change it from yes to no then save CTRL+o, CTRL+x.
To finish reload SSH:
$ service ssh restartAt this point logging in with root should be forbidden. You can try using the same command we used before:
$ ssh root@<yourIpAddress>However logging in with newUser is permitted:
$ ssh newUser@<yourIpAddress>Thanks for reading, you can interact about this post by leaving a comment here, or directly on Twitter and Facebook !